Overview
This clinic discusses many ways your home computer may be used to enhance your model railroading. Topics include railroad paperwork (timetables, forms, letterhead, rulebooks), artwork (signs, decals, control panels, building interiors, backgrounds), digital photography, PhotoCDs and scanners, track planning, drawing and photo editing programs, designing and managing railroad operation, running operating sessions, modeling-specific programs, connecting the computer to the layout, and info on selecting a computer system and software.
Railroad Paperwork
One of the easiest model railroading computer applications is the development of supporting paperwork for your railroad. Most paperwork is made using “page layout” techniques, creating text and tables and then adding graphics created with some other program.
Many computer users believe items such as business cards and passes, timetables, and railroad forms can only be made in high-end “desktop publishing” software. The reality is those packages are overkill for what we want to accomplish.
Full-featured word processors (such as Microsoft Word or Corel WordPerfect) offer all the features we need to create railroad paperwork. These word processors are able to perform highly complex “desktop publishing” and page layout design tasks, as well as serving as your core writing tool. They also include a basic vector drawing capability and the ability to include photographs and scanned files prepared in other applications.
The use of tables is the key to successfully designing with a full-featured word processor. Many items we’ll want to create are tables (timetables and forms). The organized arrangement of text and graphics (railroad stock or award certificates, layout operator’s guides, car cards) are also best created as tables. Don’t read about tabs – you’ll hardly ever use them. Most of what you’ll want to create are best (and most easily) done as tables.
However, low-end desktop publishing software is extremely useful for more easily creating certain kinds of documents. My favorite low-end desktop publishing tool is Microsoft Publisher. MS Publisher has wizards and templates to quickly and easily create newsletters, web pages, tri-fold brochures, flyers, postcards, invitations, greeting cards, business cards, letterheads, business forms, calendars, award certificates, labels, and origami and paper airplanes.
Avery (available at all of the “office supplies” chain stores) offers opaque white and clear labels in various sizes, and business card stock. Make sure to purchase “ink-jet” versions for ink-jet printers and “laser” versions for laser printers.
PaperDirect (http://www.paperdirect.com/) is a great source for custom papers (800-272-7377). They offer certificate paper (awards or “stock” certificates), business card stock, and newsletter/brochure paper useful for model railroading applications.
Creating Letterhead
The easiest form is your railroad’s letterhead. This is simply some nicely formatted text at the top (and maybe also the bottom) of a page. Letterhead looks nicer (and more “official”) when printed on nice paper. Linen finish paper was traditional for many railroad corporate offices. Ivory paper immediately distinguishes your railroad’s letter from everyone else’s standard white copier paper. Maroon (or red) and black are traditional color combinations on ivory paper. A combination of red and black, or blue and black, also work well on white paper.
Creating Business Cards & Passes
Most word processors and publishing software have templates (documents you call up with pre-prepared formatting for a special purpose) for business cards. Don’t waste money on a software package specifically to make “business cards,” instead use the template (or create your own) in your word processor. It’s a simple matter of measuring and setting the margins to match the locations of the perforations on the card stock. Most business card stock has ten cards (two columns of five) per sheet. Stock is also available with high quality pre-printed color designs or borders.
Lettering is usually smaller on a business card that you would first guess. A 7 pt type size is quite common for the small address lettering.
What’s the “pt” (points) bit you ask? Typesetting makes many measurements in points. There are 72 points to an inch. It’s a simple conversion. Since a lot of small measurements and adjustments are made when typesetting, it’s easier to say something’s 3 points, rather than 0.0416″.
A variation of a business card is the railroad pass. A pass permits free travel by the bearer. Traditionally they had rounded corners (something not available in over-the counter papers yet), but the principle may be applied (and printed on) standard business card stock. Passes usually have your railroad’s passenger rules and restrictions printed on the reverse side (like “no criticizing the layout”).
Business card techniques may also be used to produce nice membership cards for your club or division members. You may also develop the artwork and layout of the card yourself, and take final high-quality artwork to a traditional printer to have raised-letter cards printed.
Creating Stock Certificates
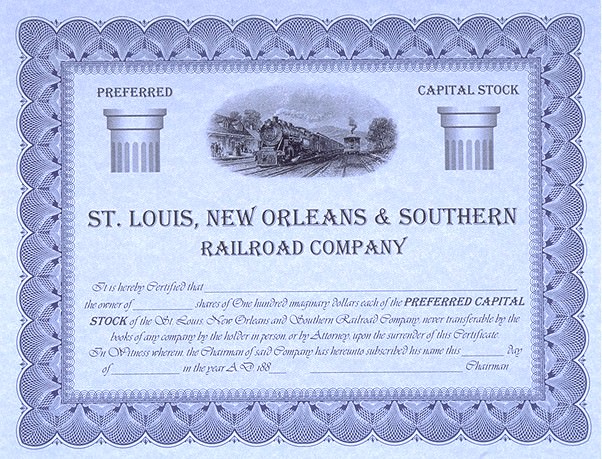
Saint Louis Southern Stock Certificate
Early railroad stock certificates were known for their elaborate engraving. Stock certificate printing companies eventually developed libraries of train images – you’re starting a new railroad, you visit the certificate printer and save money picking a “stock” train engraving!
The wording can be serious to humorous. But it’s wording you print with your word processor. Getting the appropriate train engraving for the top can be more difficult. The easiest approach is to purchase an antique certificate and scan the train. Stock certificate borders are too elaborate to print well on a home ink-jet printer. Purchase pre-printed certificate paper for a complete “professional look.”
Creating Award Certificates
A variation of the stock certificate is an award certificate. At the Gateway Division’s annual train show, I set up a notebook and laser printer and use pre-printed certificate paper to print nice-looking certificates for the model and photo contest winners. We usually mount the 1st place certificates in a nice frame/plaque for added distinction.
The big advantage is you have great looking certificates that you directly hand to the winners when they pick up their entries. No mailing to follow-up on, and nobody calling to ask when they’re going to receive their award.
We also print a “Certificate of Appreciation” for each clinician and layout on tour. These can be printed in advance, of course. It is an inexpensive way to make your clinicians and tour layout owners feel appreciated.
Creating Timetables
Timetables are basically large tables. Use the table tool in your word processor to create them. Although you may first think a spreadsheet program can be used, unless you have an “upscale” program, you will find your formatting choices extremely limited by the spreadsheet software.
There are many ways to format a timetable. Each railroad had their own idea of how they should look at any point in their history. It usually works best to get an actual timetable from your favorite road in your era and use that as your formatting inspiration.
To create the schedule timings for the table, use Train Scheduler which is available for free as an on-line Java applet, or a downloadable program from DPS Systems. This is a really neat program and one you should make sure to get (http://home.earthlink.net/~dpssys). {Update – unfortunately this link doesn’t work and I haven’t found where it moved to.}
A single-sheet timetable works well as a tri-fold letter sheet (landscape). Larger timetable books seem to work best portrait orientation, but trimmed to only 8″ tall (8×4-1/4 final folded size). Orange or yellow covers add to the charm for this saddle-stapled book style. Remember that railroads printed (plain looking but detailed) employee and (pretty, but passenger stops only) public versions.
Creating Operating Forms
Form 19 is simple: railroad name, space to write notes, place to sign form. Other operating forms, such as dispatcher and block sheets, are simply large tables. Time is more spent determining how to size and format the lettering, and what locations to include, than anything else.
Creating Operator’s Guides
Operator’s guide act as a miniature “rulebook.” Use it to communicate special operating features or issues for your layout, as well as to guide new (or forgetful) operators.
These are just fancy word processing with diagrams dropped in. A common size is 5-1/2×4-1/4 (two on a standard sheet of letter paper, folded and saddle stapled). You may want to use an orange or yellow cover to match some prototype materials.
Things valuable to include might be: a list of stops for commonly run trains, hand signals (if you use them), radio procedures, speed restrictions, what those strange unmarked switches on the control panels actually do, and most important, CLIC diagrams for the stations and industries (so you know where that setout is really supposed to go).
Electronic Presentations
Special electronic presentation software, like Microsoft PowerPoint is available. It works very well when you will give the presentation electronically live. Not may people have personal portable video projectors, so 35mm slides, or 8×10 overhead transparencies, are typically used by model railroad presenters. If your goal is to create title slides for clinics that will be projected as transparencies, they may also be written in your word processor or publishing software, printed on nice paper (“parchment” pattern works well), and shot with a 35mm camera on a copy stand. Or, if you want to be fancy and spend more money, you can add a background, save as an EPS file, and have a Photo Lab make color slides electronically from your file (at about $5 each). Special transparency material is available for your printer, and you can directly make overhead transparencies. {Update – Interesting how quickly we have gone from film to all digital.}
The title slides in my presentation were printed on an HP 890 ink-jet on ivory “parchment” paper. For those technically interested, the “screen shots” of computer programs were captured in Paint Shop Pro, printed on a color laser (for brighter and clearer color), and photographed with a 35mm camera on a copy stand (Ektachrome 100).
Artwork and Graphics
The next step beyond text-based materials is the design of original artwork. Common uses of original artwork for model railroading include structure signs and interiors, decals, control panels, and railroad marketing posters.
Drawing vs. Photo Editing
One key essential in creating good computer artwork is recognizing there are two technical categories of art, each requiring different software and techniques to produce.
Photographs and scanned images constitute the “bitmap” or “photo” category. These images consist of rows of thousands of spots (called pixels), each having color and brightness values. Bitmap images typically feature extensive texture and color detail. However the images do not “resize” or stretch well. Casually changing a bitmap to a different size will result in a grainy, blurry, course or fuzzy image as the software attempts to fill the gaps (when stretching larger) or combine together (when making smaller) the image’s pixels. Images need to be created and used at the size they will be reproduced for maximum quality.
Most people use bitmaps to reproduce existing bitmap (photo) images, perhaps with a little editing. Creating original bitmap images requires significant skill, artistic talent and practice with the software tool.
Photo editing software does not work well to create line drawings, plans, and technical illustrations. Photos are one “solid” image, individual objects in the photo (lines, boxes, surfaces, etc) cannot be easily manipulated because they aren’t individual objects. And usually there are other issues such as color matching, perspective, and varying image focus or sharpness that make it even more difficult to make extensive image modifications.
The “drawing” category creates separate objects that may be individually created, combined, and grouped with other objects. Drawings typically feature crisp lines, sharp edges, geometric shapes, solid colors or gradients, and easily modified or repositioned individual drawing elements. This is great for control panels, blueprints, electronic diagrams, track plans, or structure signs where you want those characteristics. But for many uses the colors are too solid and plain, the patterns too regular, the drawing is “too clean.” Most drawing packages allow you to “paint” an object with a photographic texture, adding to the realism. Using a drawing program requires “technical” drawing skills you can practice, adding the photo textures requires an artistic “feel” to get right.
To add subtle shading, shadows and textures to a drawing, it may be converted in the final stages to a bitmap format to add those “finishing touches.” The drawing is “exported” in an appropriate lossless bitmap format (usually TGA, TIF or BMP), making sure it is exported at the exact size and resolution it will be used, to ensure the highest possible image quality. Photo editing software is used to add the final photographic effects.
An example would be a track plan drawn in a vector program to maximize the quality of the track plan lines, layout edges, and structure rectangles. The plan is then converted into a photo editing program to add the subtle coloring and shading of the scenic contours, mountains, rivers, and trees.
This conversion is done for the 3D animations you see in movies and TV. The animations are designed and drawn in a 3D version of vector drawing programs as they involve many separate objects requiring exact positioning. Photographic textures are mapped onto the vector objects, and the resulting combination is recorded frame by frame in a final bitmap format (as video and film, like photographs, are inherently bitmap formats).
Vector drawings are converted to bitmap formats for presentation of web pages, since web pages currently only display bitmap graphics (normally GIF or JPEG). Web graphics are typically created with 72 dpi resolution, since that is approximately the resolution of the color monitor you use to view the web pages {when this was written}. The GIF format works better for graphics with sharp edges (lines, text, etc.) as JPEG tends to “blur” sharp or contrasty edges. JPEG is commonly used for web photographs, since it can store a greater range of colors and the lossy compression it uses can produce smaller file sizes (which download faster).
Vector Graphics (Drawing) Software
WMF, CGM, EPS, and AI are the common interchangeable vector file formats, most software uses a proprietary file format to make your life difficult.
Basic drawing is built into Microsoft Word, Office and Publisher. Other choices include: Corel Draw 8, Adobe Illustrator, Microsoft Visio Technical, and a whole assortment of extremely expensive CAD packages (like AutoCAD LT.
Bitmap Graphics (Photo) Software
There are lossy and lossless formats: BMP, TIF, PSD, PhotoCD, GIF (lossless) JPEG (lossy). You always want to edit in a lossless format. Good photo editing choices are Paint Shop Pro and Adobe Photoshop Elements.
Clipart
A selection comes with Microsoft Office and most drawing packages, and more is available if you search for “Microsoft Clipart” online. Vector and photographic clipart is available from almost everyone these days, and it varies tremendously in quality.
Creating Signs
Signs can vary from basic text (word processor) to elaborate multi-hued billboard extravaganzas with gradient-shaded lettering (drawing package). Look at pictures of your era to be inspired for the correct fonts and placement styles. Clipart makes it easy to create interesting backgrounds or added graphics.
Creating Crates and Boxes
Printing resolution becomes a problem for small objects like labels on crates, barrels and boxes. Create your artwork lots larger (and therefore clearer) and then make a copy you reduce to the final size.
Cardboard appliance boxes are easier since they usually have only black printing. Laser printers now commonly print with high enough resolution to print boxes actual size on brown kraft paper (well, maybe not for Z yet …).
Creating Decals
You can use your drawing program to create decal artwork. Contact the decal manufacturer to verify the width they print. Typically there is a fixed width and you are charged by the vertical inch. Artwork usually must be provided twice actual size. Make sure to print tests varying the size of the lettering, you will find that your first guess likely is not the correct size to use.
You can also create artwork to print to decal paper. The problem is laser printers and color copiers can’t make opaque light colors (yellow, white, orange, silver, dulux). Black from a laser printer reproduces great. Color lasers do very well with black, dark red, blue and green, and moderately well with regular red, blue and green. Most of the time you need to print on white decal paper matching the background color of the object as the background color of the decal. Building signs can be easily made on white background paper. Red and black on a white background is exceptionally stunning. If you use an ink-jet printer, make sure you are using permanent inks – the standard inks usually fade in a couple of years. Alps used to make a special printer which can print white and metallic gold and silver on clear decal paper – good luck finding one or the supplies for it!
The objective of decal artwork is to squeeze as much as possible onto the area (maximize your value). This is different from making artwork to pad print a car, it that case you have to place the artwork exactly where it will go on the car, taking into account all of the molded-on detail on the car and how it will effect the printing. You need to test check again and again to make sure you get the placements right before sending off the artwork to have the cars printed.
Creating Control Panels
Draw your control panel. Make sure to give the pushbuttons and toggle switches plenty of room.
Technique 1: Color print sandwiched between clear Plexiglas (on top) and something else (Masonite, thick styrene). Disadvantage: have you ever tried drilling Plexiglas? Hint: They make special drill bits.
Technique 2: Dye-sub overhead transparency printed so the image side faces down. Dye-sub transparencies are printed on Polyester – very tough. Use double-side adhesive sheet to affix to a pre-drilled brushed aluminum sheet. Thick styrene also works for small (4×6) panels. Disadvantage: cost of dye-sub print. {Update – And they’re really not available anymore.}
Technique 3: Avery makes 8-1/2×11 clear label sheets. Use a color laser printer (ink jet won’t work – rubs off) to print the panel on the clear label. Stick the label on thick styrene after cleaning the styrene with alcohol. Disadvantage: label can peal back at the edges with time. Why the clear label and not a white label? The white label yellows quickly, damages easily, and peals off much faster.
Creating Building Interiors
Your drawing and photo editing software may be used to create patterns for objects like wallpaper and carpet. Clipart is available for wood floors and brick walls.
Drawing interiors usually give a result that doesn’t have enough detail to look right. Photographed and scanned objects are more realistic than objects the average modeler can draw. The easiest way out is to take photos of real interiors and retouch them to work for your situation. You may also arrange model items and photograph them as well. Here are four interiors created that way for your warehouses.
The scan of the photo is edited and sized to scale and to fit the building interior. It is also much easier to photograph items at an angle than to draw them that way.
You can also take photos of items (real or model) and use them to create your own clipart to fill warehouse floors and store shelves and display windows. Corel and other vendors offer PhotoCDs of photographs, including one of restaurant interiors, some of industrial plants, and another of individual pieces of antique furniture.
Creating Store Windows
Print on overhead transparency material and cut out as the window. Use dark colors, as light colors are not effective (same problem as with decals). Make sure the interior of the building has light colored shelves so the dark lettering on the window is readable.
You can also print, cut out, and hang paper signs in the store windows. Or print blinds and draperies.
Creating Backgrounds
Take photos of the real world (it helps if you take level, straight-on, well lit photos, of course), get a quality scan (PhotoCD), retouch out unwanted items (any maybe add something you want – a different sign perhaps?), and then have it poster or dye-sub printed. Poster printers can create images up to 100′ feet long (although very complex and expensive to do). This New Orleans warehouse is a perfect background structure.
Creating Stand-In Structures
Just as you can create individual buildings for background relief, such images may be attached to a foam board box to “mock up” a custom structure. In addition, you can build you own structures by using your photos as “clipart libraries” – a window from here, a door from there, a brick column from over here .…
Creating Marketing Posters
Railroads historically stuck their name on everything to create brand recognition with the public. Marketing and travel posters promoted the railroad as much as (or instead of) the destination.
Clipart or scans from original railroad art may be used. Look at railroad art of your period for ideas.
Digital Photography
When this article was written digital cameras were just becoming available. Now, digital has taken over the world of photography and produces great results.
Scanners
“Enhanced resolution” is a term used to lie about the quality of the scans produced. You must compare the true optical resolution (a term some manufacturers use to mislead as well) of the scanner to determine what it can actually produce.
It’s usually not cost effective to purchase a scanner as the cheap ones are disappointing and the expensive ones are expensive – instead rent time on a good scanner at your local copy center.
To scan 35mm slides and negatives, the Nikon Super CoolScan produces excellent results. Each 36-bit color scan takes about 30 seconds (after you set the scan up). However, for the price of this scann you can purchase a whole lot of PhotoCD scans, and you’re not sitting there for hours doing the work.
PhotoCDs
PhotoCD is a technology developed by Kodak which offers low-cost, high-quality digital scans from color or B&W slides or negatives. It is a very cost effective means of archiving and retrieving large numbers of images. PhotoCD creates a photographic-quality scan. Consumer digital cameras and home scanners create a web-site quality scan. {Update – PhotoCD has disappeared, but many companys offer high-quality film and slide scanning services and burn them to CDs or DVDs.}
It is much more cost and time effective to have your slides or negatives scanned to PhotoCD than to attempt to scan them yourself. And unless you purchase an extremely expensive scanner, and spend lots of time learning how to use it, the PhotoCD scan will be vastly superior in quality than any of the scans you would create.
Nonlinear Computer Video Editing
Easy way to spend lots of money and all your time. Could be a whole series of clinics by itself. This technology will become cheaper and easier in the future. {Update – And it has. Great video editing software is available from Adobe, Sony, Corel and Avid. Oh, you still get to spend a lot of time.}
Track Planning
Drawing software can be used to design layouts. An easy application is to draw proposed benchwork arrangements that fit your space to use to free-hand “doodle” potential track plans. A number of companies offer software specifically for this purpose.
Entry level choices include DPS Rail, Atlas Right Track (online demo version avail.), Abracadata 3D Railroad ($100, online demo avail.), and Sillub XtrakCad (online demo avail.) http://home.earthlink.net/~dpssys (DPS Systems) http://www.atlasrr.com http://www.abracadata.com http://www.sillub.com The two “big dogs” in this market are El Dorado 3rd PlanIt ($100) and Cadrail ($100, online demo avail.). http://www.eldoradosoft.com http://sandiasoftware.com
Designing and Managing Railroad Operation
DPS Systems offers Train Scheduler for Free! They have an on-line Java version, or a downloadable program (http://home.earthlink.net/~dpssys). It does all of the calculations and can create train graphs! You want this program!
Running Operating Sessions
Shenandoah Software offers a waybills program to print the McFall system of waybills ($15). You need their MiTrains Inventory System ($40) to print the car envelopes. They offer both together for $50. http://members.aol.com/Shenware/order.html
Of course you can create your own paperwork with word processing and drawing software. Specialized software is needed to model other aspects of the prototype, however.
ProTrak ($197) does real time total operations railroad management for serious operators. Not just waybills and switchlists, but measure costs and revenues, rates, routing, tracking, car loading, operating and engineering rules, service and interchange rules, hazmat handling, yardmaster cuts and tag lists, …. Well, you get the idea. http://www.intranet.ca/~moir.sdr/index.htm
Distractions and Useful Additions
Games, screen savers, reference CDs, cab simulators, dispatching simulators. I have a friend (now retired) who limits himself to only four hours a day with his cab simulator. Abracada specializes in this entry level of this category with products like Train Engineer Deluxe ($40, online demo avail.), Trains Screen Saver ($20), and Freight Train (operations game, $30). Sandia has Multimedia Adventure Kits for an interactive CD-based tour of real railroads like Cumbres & Toltec and Durango & Silverton ($50 ea) which includes maps and drawings in addition to the hundreds of photos. http://www.abracadata.com http://sandiasoftware.com
Reference material are growing. Atlas recently put their entire track plan library on a CD. Data Trains of Texas sells an index to most of the popular hobby magazines. I have one friend who constantly gets calls from other modelers to lookup information in DT Index for them.
MiTrains offers an Inventory System to track your rolling stock. It has options to assist the Micro-Trains collector as well. The Waybills program is an add-in to the Inventory System ($50 for both). http://members.aol.com/Shenware/mitrains.html
Your Own Web Page
You first arrange for web space and bandwidth with an ISP (Internet Service Provider). ISPs will have content, space and bandwidth restrictions. Many “home use” ISPs provide, in their basic rate, minimal space and bandwidth for a personal home page. Your web address will be a directory name they will create for you. For example, the Gateway Division’s first site was on PostNet’s server, and we did not pay extra for our own domain name, so its address was http://home.stlnet.com/~rlake
If you want your own domain name, you will need to arrange for “commercial level” web services from the ISP, and will also have to pay InterNIC a registration and maintenance fee for the use of the domain name. Our Division’s new site is setup this way, so its address is https://www.gatewaynmra.org
You create web (HTML) pages and upload them to your space on the ISP’s server. You may create HTML pages with a plain text editor, or you may automate the process using software which can generate HTML pages.
Microsoft Publisher 98 ($100) has the option to easily create web pages, or convert other materials you made in Publisher into web pages (this clinics web site was formatted using Publisher). Microsoft FrontPage 98 ($100) is an example of higher-end software specifically to create web sites. Netscape Publishing Suite ($130) uses NetObjects FUSION PE for the web authoring. And if you want to put complex drawings online, Adobe Acrobat ($190) will help you create files that others can view and print and still retain the exact formatting you originally intended.
Connecting the Computer to the Layout
If you use Digitrax, their MS-100 interface ($45) allows you to monitor your LocoNet network with software like WinSniffer. Third-party software, such as WinLok ($180), is required to use this interface for LocoNet layout control. http://www.digitrax.com http://www.digitoys-systems.com The Digitrax PR-1 decoder programmer ($45) makes configuring advanced DCC options much easier.
Bruce Chubb did a whole series in Model Railroader, which he updated in his book on the subject and in an MR article last September. His wife’s company sells the circuit boards you need to reliably assemble the system. If you want to control your layout from your computer, get this book:
Chubb, Bruce “Build Your Own Universal Computer Interface, 2nd Ed.”, McGraw-Hill, ISBN 0-07-912639-1 ($35).
Bruce also released a new self-published book, “The Railroader’s C/MRI Applications Handbook” at the KC NMRA National Convention. This is an essential book to have if you want to connect your railroad to a computer. If you have both of these books, you will have the latest info on all of Bruce’s circuits and applications.
If you want to experiment, you may also purchase a digital I/O card which installs inside your computer and connects to the layout using circuits like Bruce describes in his book. Jameco (800-831-4242, call for a catalog) offers a 48-bit digital I/O card for $99 (p/n 136784) in this category. You have to create your own circuits and programming – this approach is for people who like that challenge.
Other companies are starting to offer preassembled circuits for computer control. CTI Electronics (http://www.cti-electronics.com) has a system which connects to the serial port to monitor and control your layout through devices connected to modular phone cable under the layout. It works with conventional engines as well as DCC. They have a $99 starter kit and you add from there. Because it is designed to be easy to connect, the price per card is fairly high (that’s one of the big trade-offs with all kinds of computer to layout connections). The “Train Brain” ($80) is a 4-input, 4-output card, the “Smart Cab” ($90) is a 100-step throttle, and the “Signalman” ($70) controls 16 lamps.
Selecting a Computer System
Most any (non bargain basement) computer will run the software you want to use. For those that get into video editing, drawing, or heavy photo editing, you’ll find that a computer with more RAM and a graphics card with CUDA processors (if supported by the software you use) will make things go a lot faster.


