text and graphics by Richard Schumacher
Originally presented as a clinic at the Long Beach NMRA National Convention
Always be extremely careful when connecting power to the detector and other boards with integrated circuits (ICs). If you connect the power the wrong way, you will likely destroy the ICs. Check twice before powering up!
The detector may be assembled on either a general purpose IC PC board, such as Radio Shack 276-150A, or with a custom-made printed circuit board. Project-specific custom printed circuit boards always add greatly to the cost of the project, even if “home made.”
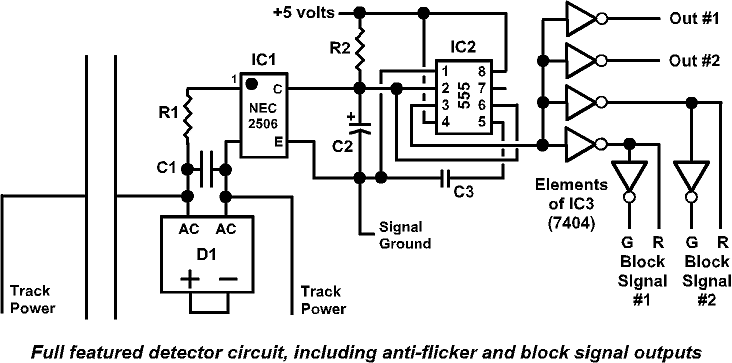
Full featured detector circuit diagram
The easiest way to make a disaster out of an electronics assembly project is to use the wrong soldering iron and solder. To assemble a circuit like the detector, you need a 15-watt soldering iron with an iron-clad tip. A starter iron would be the Radio Shack 64-2055 dual-wattage iron with the 64-2058 tip. Iron-clad tips are cleaned by rubbing, when hot, on a dampened sponge. Never file or sand an iron-clad tip. This iron is especially handy for modelers, since the 30-watt setting works well when soldering wire to rails. A better Radio Shack iron can be assembled from parts: 64-2080 handle, 64-2081 23-watt element, and 64-2089 tips.
You also need the correct solder. Very thin, rosin core solder is the best for electronics projects, especially when soldering ICs. The 60/40 .032″ solder from Radio Shack (64-005 or 64-009) is about the right size and works well.
Assembly hints: Parts are inserted on the side opposite the copper pads. Drawings usually show the parts side of the board. You will want to insert the ICs first. Bend the leads (wires) over on the copper side, flat against the copper pads. Trim the excess wire away. The trimmed leads work well for some of the wire jumpers that may be required on the parts side of the board. Be very careful that you do not short across adjacent pads. Use solid wire to make jumpers, or purchase zero-ohm resistors to use as jumpers (Digi-Key 0.0QBK-ND, $4.93/200).
Don’t solder all the pins on the ICs one after the other in a row – you are more likely to overheat the ICs. Instead, solder in a more random pattern.
Assembly Instructions
One of the major advantages of this circuit is that it can be assembled without the need for a relatively expensive custom printed circuit board.
A number of modelers who have attended this clinic or read my original article in the RPO have come to me and said, “Sounds good, I would like to try it – but I’m not sure how to actually build a circuit from those squiggly lines.” This section shows how to assemble the full-feature detector on a hobbyist circuit board available from Radio Shack.
This project starts with a Radio Shack 276-159A “dual general purpose IC PC board” ($1.69). The design of this board makes it easy to assemble integrated circuits for hobby uses. A custom-made printed circuit board for this project would make the assembly slightly easier, but increases the cost.
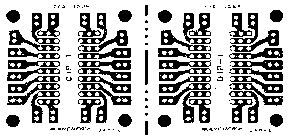
Radio Shack 276-159A “dual general purpose IC PC board”
Clean the copper side of the board, if is not shiny, to make soldering easier. Parts will be installed on the plain (non-copper) side, with solder connections made on the copper side.
Start with the largest integrated circuit (IC), the 7404 (IC3 on the parts lists). This is a black rectangular package. Seven wires come out of each of the two long sides and are all pre-bent in the same direction. The direction of these wires is the “bottom” of this part. The “top” side has batch and part numbers, somewhere you will find “7404” in those numbers. The top side also has a notch in one of the short ends, or there is a dot on one of these short ends. This notch or dot is used to indicate “pin 1” of the IC. If it is connected backwards, it will not work.
All the parts used in this project are inserted on the side of the board with no copper. The drawings show this parts side of the board. The copper side is ghosted in gray so you can count the holes and better see where the parts fit on the board.
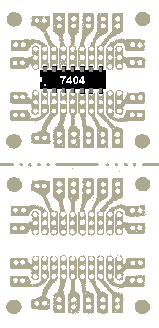
7404 placement
We are now ready to insert the first part. Take IC3 (which you looked at a moment ago), and insert it as shown on the drawing. First, put the board in front of you with the copper side down. Rotate it until the holes match the drawing (look at the top row of holes, the leftmost set of small holes in the top row are horizontal, and the other sets of small holes are vertical – if it’s not, turn the board 180 degrees and the holes will then be right).
Now that the board is positioned properly, let’s look at the pattern of holes on the board. You can see that the pattern is duplicated twice on the board, with a “break” line across the center. We do not want to break the board apart, both the top and bottom will be needed for the circuit. There are also eight large holes, a screw will be placed through one of these later to mount the board to your benchwork. The pairs of holes between these large mounting holes will make connections to the layout later. Inside those pairs of small holes are two groups of holes, arranged in rows, with three rows for each group. These holes will hold most of the parts. They are patterned on this board to hold IC chips.
IC3 is placed in the inner set of small holes, one side in one of the sets of three rows, and the other side in the other set of three rows. All 14 wires must go through holes (a common error is to bend a wire so it doesn’t go through the hole). Note that the end of IC3 with the “notch” or “dimple” is towards the left. Also note that the pins don’t go in the first column of holes, they go in the second column.
Once you are sure IC3 is on the right end of the board, and the wires are going through the correct holes (check against the drawing), pick up the board and press IC3 firmly against the board with your thumb. As you turn over the board, you will see the 14 wires extend out from the copper side. To hold IC3 in place, we are going to bend over all these wires.
While firmly holding IC3 against the board with your thumb, take a small flat blade screwdriver and push each wire down flat to the surface of the board, one at a time. You do not want these wires to touch, so to push them down towards the non-copper area between the two rows of wires. The board has “DIP-1” wording in this area. Keep the bent over wires “lined up” and extending away from the vertical columns of three holes to put as much possible space between the bent over wires and avoid them from touching.
We are not going to solder these wires yet. Bending over the wires has made a very strong mechanical connection of the part to the board – it’s not going anywhere. We are now going to add most of the other parts, bending those over in the same manner to hold them in place. Make sure to bend wires over so they do not touch, or do not short across the copper areas.
The other two ICs are added next. IC1 and IC2 are located on the bottom half of the board. Locate the parts in the correct holes, making sure the “notch” or “spot” of each chip is towards the left. IC2 has 8 wires as two rows of 4. IC2 is located in the rightmost set of holes. Check the top of IC2 and make sure the “notch,” which is in one of the shorter ends, is towards the left.
One set of holes is left open to the left of IC2, between IC2 and IC1. IC1 has two rows of 2 wires. You will have to look closely to see the little round spot on the top of IC1 next to one of the wires. This spot identifies “pin 1” of the part. Rotate IC1 until the spot is in the “bottom left” corner as you are looking at IC1 from the top side (“top” is the side away from the wires). IC1 will be inserted properly with the spot at “bottom left.” Compare your work against this drawing.
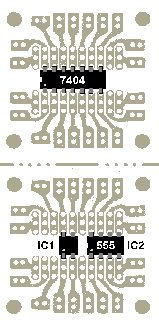
555 and detector chip placement
Using the same technique as before, bend over the wires from IC1 and IC2 on the copper side of the board, making sure they don’t touch each other or any other copper areas.
The remaining parts are installed on the bottom half of the board, where you have just installed IC1 and IC2. The next few drawings will only show that part of the board.
Resistor R1 and capacitor C1 are installed next. Resistors look like straight pieces of wire with a beige epoxy cylinder at the middle. Colored stripes indicate the resistance value. Resistors have no polarity, so you can’t install them wrong or “backwards.”
Resistors are installed by bending both leads in the same direction, making a “U” shape. Place the leads of the resistor in the correct holes. While holding the resistor firmly against the board, trim off the excess wire on the copper side. You want about 1/10 inch of wire extending beyond the surface of the board (about the same as you had with the IC chips).
The wire on electronic parts is coated to solder easily. Keep the wire you trim from resistors and capacitors to use as short jumpers on boards. We will need some jumper wires on this project. You will find this wire easier to use for jumpers than ordinary wire.
Bend R1 into a “U” shape. Insert in the correct holes (see the drawing below). Hold against the board and trim the excess wire, leaving about 1/10 inch sticking out from the copper side. Bend the leads down, the same way you did the IC chip leads.
When you bend down leads you want to avoid covering other holes. The wire will eventually be soldered to the copper pad surround the hole to make the electrical connection. Avoid creating a short circuit by touching other copper traces or pads that are not directly connected to the copper pad that surrounds the hole.
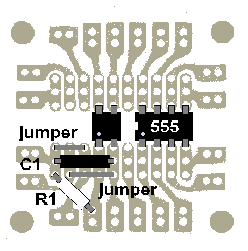
Capacitor and jumpers
Capacitor C1 is installed next. Some capacitors are polarity sensitive, they can be connected the wrong way. “Electrolytic” or “tantalum” capacitors are the ones which can be installed wrong, and some are used later in this project. “Disc” or “poly” capacitors are not polarity sensitive, and like resistors, can’t be connected wrong. C1 is a “poly,” so it can’t be installed wrong. Note that C1 should not be installed for command control system detection.
Insert C1 into the correct holes, trim the excess, and bend over the leads. If you bend the lead in the middle “up” and the lead nearer the edge “down,” you will find that C1 will stay in place.
Install two jumpers, one on either side of C1, as shown on the drawing. The jumper wire is installed on the same side of the board with the other parts. Use excess wire you trimmed from C1 or R1, bent into a “U” shape to fit the distance between the correct holes, to make the jumpers. Hold the jumpers against the board, trim the excess, and bend to hold in place.
D1 is a bridge rectifier. It is a flat package with four wires coming out one end. Markings on the side of the bridge will indicate which wires are plus, minus, and AC. The plus wire is longer that the others. For this circuit, the plus and minus are connected together, only the two “AC” wires get connected to the board.
Bend the plus and minus wires out to the side at the point where they leave the bridge. These are the end wires on the part numbers I specified. Make additional bends so these two wires are connected together, about 1/8 inch out from the bridge. Trim excess wire from these two leads, and solder them together (on the 2-amp bridge use a 15-watt iron, use a 30-watt iron for the 4-amp bridge as it has heavier wires).
With the soldered connection on the side away from the board, insert the two “AC” leads from D1 into the holes shown on the drawing below. If you use the heavier 4-amp part (which is recommended for command control systems or current hog motors), the holes may be slightly small and will have to be enlarged before installing.
Leave about 1/4″ air gap between the bottom of D1 and the board. Using the appropriate solder iron, solder the two leads of D1 to the copper pads on the bottom of the board. When the solder cools (good joints are shiny), trim the excess wire.
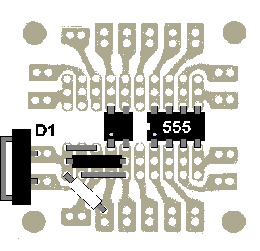
Bridge installation
Using a 15-watt soldering iron, solder the parts on the first five pads next to D1. This includes R1, C1, the two jumpers, and the bottom two leads of IC1. Do not heat the pads or the wires very long, only one second is actually required with clean parts and a tinned tip on the iron (see “tips” column). Use very little solder (using extra-thin solder helps the beginner), you want to avoid “bridging” across the copper pads with solder blobs. Don’t solder the leads from IC2 or IC3 now, we first need to add more parts.
Locate and install R2, C3, and three new jumpers from the drawing below. These parts are not polarity sensitive and cannot be installed “backwards.”

Additional components
C2 is an electrolytic capacitor, which is polarity sensitive. Electrolytics have the minus side marked on the case (look for a band with “-” printed on it). The positive lead is also made longer. Install C2, making sure the positive lead is towards the left.
C2 sets the turn-off delay of the circuit, which provides “anti-flicker” for dirty track, and simulates the time it takes real railroad relays to reset. A one second delay is provided by 10 mfd, the value for C2 in the parts list. You may substitute a larger value if you desire a larger delay, 22 mfd gives two seconds, and 47 mfd is four seconds.
Using solid, 22 gauge, insulated wire, make the two wire connections shown in the drawing below. The same wire may be used for the third “jumper” marked with the arrow, or you may use a “zero-ohm” resistor which is a wire with a “resistor” blob in the middle (Digi-Key 0.0QBK-ND, $4.93/200).
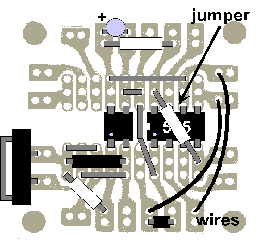
"Zero-ohm" resistors act as insulated jumpers
“Breadboard jumper wires” may be used to make these wire connections. They cost more than normal wire as you are paying for them being precut to specific sizes and each end pre-stripped and bent to a right angle. 3M brand wires may be ordered from the Digi-Key catalog.
Using the 15-watt iron, solder all the remaining connections on the bottom half of the circuit board. Make sure to solder all the pins from IC1 and IC2 to their copper pads. Use only a little solder, and work quickly. Check that you don’t “bridge” across pads, and pause every so often for the board and parts to cool. It is easy to overhead an IC if you solder each pin one after the other, so randomize your soldering pattern to spread the heat around.
At this point, the detector circuit on the bottom half of the board is complete. Turn your attention to logic decoder circuit on the top half. Install the five jumpers, two wires, and tantalum capacitor C4 as shown below.
C4 is polarity sensitive. The longer wire is the positive side. Tantalum capacitors usually have the positive side also marked with a printed “+” sign on part (be prepared to pull out your magnifying glass to find it!).

Parts for the other half of the board
The circuit may work without C4 for certain cases (really small layouts). C4 conditions the 5-volt logic power at the point of connection to the circuit board, which is a standard recommended electronics practice. It is added to reduce common power problems.
IC3 decodes and buffers the output of the detector circuit. This one part breaks the output into two panel LEDs and two red-green LED block signals. If you are using two-color LED block signals, this gives you everything you need for a “normal” block. The 2-color interlocking controller discussed in the last issue is connected directly to this detector to control 2-color interlocking signal heads. The “red” outputs from this circuit can also drive 3-color signal controllers for those of you who really like to pull wire.
Add three more insulated wires to connect the circuits on the two parts of the board as shown below. This will complete the assembly process.
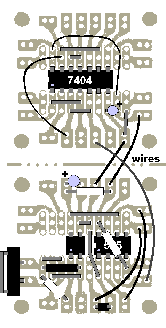
Wires between the board halves
The 5-volt supply has two outputs called “+5” and “signal ground.” The “signal ground” is the common return for the electronics on detectors and signal control circuits. It is not to be confused with the “track common wire” which provides a similar function for track power. The “track common” and the “signal ground” must be connected together, but only at one location. They must be kept apart everywhere else. This avoids logic problems with the electronic circuits caused by the resistance of wire runs. The “+5” and “signal ground” are best run together as a pair of wires under the layout (and use good wire, such as 16 gauge stranded copper – “speaker” cable works quite well).
This last drawing shows the connection points to the board. The two track connections are at the bottom, the signal power is at the middle right, and the panel and signal head LEDs are connected at the top and in the middle of the board.
Always be extremely careful when connecting power to the detector and other boards with integrated circuits (ICs). If you connect the power the wrong way, you will likely destroy the ICs. Check twice before powering up!
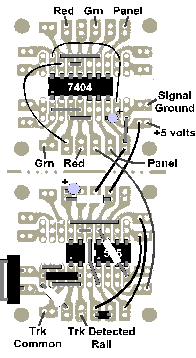
Connections to circuit board
LED connections are made through 330 ohm, ¼-watt resistors to the +5 volt signal power as shown here for a 2-color block signal head. A panel LED is wired the same as the red LED.
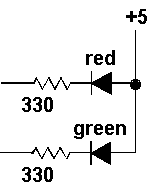
Connecting LEDs
The circuits included in this article are designed for hobby, not commercial, use. Soldering irons and 110-volt household electricity, and the materials used in circuit construction (such as solder and flux) can be dangerous. Do not attempt to do any work, especially with household electricity, when you are unsure how to proceed. Never leave a hot soldering iron (which can cause fires and burns) unattended, especially when children are present. Richard Schumacher and the Gateway Division NMRA does not assume any liability for any damages or harm resulting from the use or misuse of the information or techniques presented in this article.
Warning! Prices and part numbers presented in this handout were taken from Digi-Key’s Sept. ’95, Jameco’s Aug. ’95 and Radio Shack’s “Answers” 1995 catalogs. Obviously, prices have increased ever so slightly since then. Digi-Key and Jameco offer discounts for quantity (usually 10 or more) parts purchases. For current parts prices, and to see what other parts are available (like really neat LEDs), their catalogs may be obtained by calling their toll free numbers: Digi-Key 800/344-4539 and Jameco 800/831-4242.
Click here for Part 3: 2-Color Signal Circuits


