Basics of Operations, Car Cards and Waybills for Your Model Railroad Layout
by Robert D. (Bob) Johnson
President
Pseudo-Soo Line Model Railroad
After my presentation at the Fall Gateway Convention, a voice from the back of the room asked if I could convert it to an article for the RPO. Fortunately, at that very moment my laptop flashed the “blue screen of death” and I could dodge the question. In spite of that, I knew I had been asked and I knew it was something I should do. Besides, it might give me a couple of points for my “Author” merit badge (Certificate of Achievement).


![]()
‘Tis not as easy task to convert those PowerPoint slides to understandable text. But here goes.
Model Railroad Operation
I believe that model railroad operation is one of the world’s most magnificent board games. Linn Westcott, long time editor of Model Railroader, first expressed that view in an editorial in the 1960s. Operation has all of the elements: a playing board (your layout) with multiple paths to success (trains), tokens (your rolling stock), a card deck to choose from (your waybills), and probability (will we make the meet?). If you are successful, the correct cards get to the right places more or less on time. If you are not successful, you will have chaos and a good bit of frustration on the part of your operators.
I am not going to delve into the complexities of layout design. There are more competent folks to do that. I will give a couple of examples of train orders as I do it on my Pseudo-Soo Line (PSL). However, the key for me is car forwarding, that is, ways to direct the movement of specific cars to specific destinations so the railroad can earn its keep. I will mention several such schemes and detail my own paperwork and that available from the NMRA Operations Special Interest Group (OpSIG). I will also give a few “if I had to do it over again” suggestions.
Before you can produce train orders, you have to figure out what trains are required to work your industries and serve your passengers. You can omit this step if you just have a switching layout, but as soon as you add trains actually going somewhere you need to at least conceptualize a schedule. As the layout and work to be done gets larger, you need a good methodology to make all of the work fit into the time available (normally the length of your operations session). There are numerous software programs that can make this effort relatively painless, but it can be done manually. The end result will be a “string diagram” showing when yards are busy, where trains will meet, etc. Of course, you will make some train runs to prove you can switch 12 cars at eight industries in 15 minutes!
 Then you can write your train orders. Figure 1 shows one of my train orders for a passenger run. Figure 2
  is an order for a freight job, in this case a turn (e.g., out to an industrial area or interchange and back again).
The train order provides the information the operator needs to do his or her job. It gives the train name and number, where it originates, what it does, and when it does it. Finally, it tells where it is supposed to end up at the end of the run. Happily, my layout is a simple oval so trains like the Atlantic Limited always end up where they started. It sure makes getting the layout ready for the next session easier!
A freight train order is similar but lists the industries to be worked. Note that it also provides a tonnage limit, 10 cars in this case. This is scale model railroading and if I can suppose my HO track is 4 ft 8½ in, then I can suppose that each car on the layout is equal to five cars on the prototype. Fifty-car locals would be a pretty good size drag for the era and region I model.
My train orders are printed on 3×5 inch cards. I use Avery 5388 index card stock (three 3×5 cards per sheet) so it is easy to produce a corrected version or replace a mangled one if necessary (operators can be pretty hard on your paperwork). I also use 3×5 inch index cards for my car cards so the package of train order and car cards is easy for the operator to handle.
That, of course, was the easy part! The big questions are: • How do we decide what cars go where? • How do we know how to get them to their next destination (the routing)? • How do we know which cars to pick up? • How do we make the movements “random?” • How do we keep from going nuts!!!
There have been numerous car-forwarding systems proposed over the years. For convenience I have broken them into five general schemes: • Car-for-car replacement • Switch lists • Color coded tacks • Single destination waybill cards • Multiple destination waybill cards
Car-for-Car Replacement
With car-for-car replacement you make up a train in your yard and tootle down the track. At the first industry, you pull cars currently in place and replace them with appropriate cars from your consist. Cars pulled from industries go to the rear of the train; cars being delivered come from the front. Soon you will have used up the original cars and start re-spotting cars you picked up a few industries ago. You don’t need many cars initially to switch the entire railroad.
This is a good way to make sure your layout is working reasonably well, make sure run-arounds are long enough, and so on. If you haven’t done much switching work it will give you a chance to practice. However, it doesn’t provide the challenge of having to put the “right” car in the “right” place.
Switch Lists
Switch lists are usually computerized and have achieved some popularity. Some folks manually prepare switch lists but it can be very time consuming. Some owners combine the computerized/written list with car cards so there is a piece of paper for each car at each industry. I have used switch lists on other layouts and found them difficult to work with. In addition, after each operating session, you (the owner) have to survey the entire layout to make sure cars ended up where the computer thought they would. If not, you need to make corrections to the database or more the cars before the next list. Overall, computerized lists seem a lot harder both for the owner and the operators. It is up to you, but I don’t recommend them, especially as a starting point.
Color-Coded Tacks
The Color-Coded Tack (CCT) system was proposed by Ed Ravenscroft in the July 1965 issue of Model Railroader. I have never seen it in use, but it is a good way to explain what we are trying to accomplish.
The method does require a small hole in the top of each car to hold the tack. You need as many tack colors as you have trains to run. Strangely, thumbtacks seem to be a dying breed (push pins are “in”) but can still be found, mostly with plain white or steel finish. You can air brush or hand paint the colors you need. Every piece of rolling stock on the layout except locomotives, cabooses, and cars captive in unit or passenger trains, needs a tack. If your passenger service adds or drops diners, mail cars, or express cars during a session, you will need tacks for these cars. You also need perhaps as may more for resetting the layout after each session. Finally, you need a tack of the appropriate color at each industry/spot. That tack is placed so the engineer can see it when working the industry.
With this system, the yardmaster can easily sort the color-coded cars into trains. However, we also have to indicate the recipient industry. That is done by a single letter on each tack written with an indelible pen. Thus, the yardmaster can sort not only by train, but can block (group cars together) by industry.
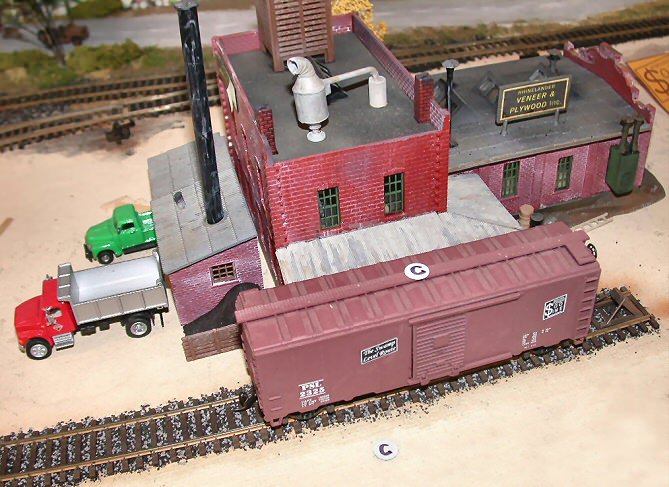
 The operator then matches the letter code to the actual industry out on the road. Very easy to learn and no paperwork! The downside is that little, almost invisible hole in the roof. Of course, that would normally be hidden by the tack.
The photo shows CCT at the Rhinelander Veneer and Plywood plant on my PSL. Note the industry identifying tack on the table. This could very easily have been mounted on the face of the building and would be very inconspicuous.
Figure 4 is a diagram of a small railroad at the end of an operating session. The rectangles represent cars, each with a color-coded tack as a waybill. The letters on the rectangles represent the color of the tacks, not the industry code. G=Green, O=Orange, R=Red, and Y=Yellow.
 It was a miracle! All of the “orange” cars were delivered by the “orange” train to their proper spots at the Mill. The same is true for the “green,” “red,” and “yellow” cars. Cars left in the yard presumably arrived in the yard after the appropriate train had departed. They might have come from any place on the layout. For example, the “red” car in the yard might have started the session on the AB&C Interchange. During the next session, the “red” car will undoubtedly make it to the staging track via the “red” train.
Between sessions you “reset” the layout. That doesn’t mean you move all the cars willy-nilly around the layout. Instead, you grab your trusty box of spare color-coded tacks and replace the tacks on those cars that are at, what I call, “endpoints.” That is, the cars that have arrived at their correct destinations. The cars in the yard haven’t gotten to their destinations, so those tacks remain undisturbed. Figure 5 shows how the layout now appears.
 Notice that one of the “orange” cars at the Mill did not get a new color. This could happen for either of two reasons. First, because you were picking your replacement tacks randomly, there was a chance that you would pick another orange tack. The other possibility is that the Mill, you decided, can only load or unload two cars per day (that’s a “scale” 10 cars in my system). Therefore, one of three cars won’t get loaded/unloaded and should not leave the Mill until the following session.
 Now, let’s look at the situation after the first train of the next session has run. We will assume the Mill job, the “orange” train, is first out. Figure 6 tells the tale.
Comparing the two diagrams, you see that the train gathered up the two “orange” cars in the yard and delivered them to the Mill. The “orange” car that had been at the Mill is still there. The “green” and “yellow” cars that were at the Mill have moved to the yard. As you continue through the session, the “yellow,” “green,” and “red” cars in the yard should all make it to their endpoints. Some of the cars now at the Interchange, Greenville, or Staging will make it to their endpoints, others only to the yard, depending on the schedule of arrivals and departures.
Ed Ravenscroft developed the CCT scheme on his layout in Chicago. He expanded on the method after retiring to the Phoenix area in 1964. Ed passed away in 1998 and his crew continued to use CCT until the layout was dismantled a couple of years later.
Single-Destination Waybill Cards
That brings us to car card and waybill systems. The earliest systems were discussed in the hobby press in the late 1940s. Even Ed Ravenscroft wrote about a method a few years before he created his CCT system. Commercially produced car card and waybill forms have been available for many years. In this discussion I have used my home grown system and the system developed by the Operations Special Interest Group (OpSIG) to demonstrate the critter. There is no perfect system for all layouts, so these are used only as examples of the methodology and paperwork involved.
 First you need a “car card,” one for every piece of rolling stock on the railroad with the same exceptions noted for CCT. Figure 7 is a sample of my homegrown car card. I use standard 3×5 inch index cards.
The only mandatory information is the reporting mark, in this case “PSL 2535,” and the car type, “Box.” I try to keep everything simple so I don’t subdivide car types by size, fittings, etc. You could indicate all sorts of special configurations if you wish, but it will greatly complicate your paperwork.
The only other requirement is a way to attach the waybill. I form pockets from 3×2½ inch pieces of transparency film, the kind used with overhead projectors. The least expensive kind is the “mark on” style (about $15 for 100 sheets at office supply stores). Transparency film made for laser or inkjet printers is much more expensive. Of course, you might be able to salvage a few sheets of film from your sales department t work. A small pack will suffice for a lot of car cards. Use heavy-duty packing tape to attach the acetate – everyday “Scotch” tape will not last long.
You could also use paper clips to attach the waybill. This is quick and easy, but paper clips get caught on other waybills and car cards.
You can add other information. Some operators like to show “When empty return to ________.” You can also use the card as your record of when you bought the car, maintenance actions, who gave it to you if it was a gift, and so on. Be sure this information is either on the back or hidden under the waybill so it won’t distract your operators.
Your waybills are your most important documents to ensure smooth operations. But, before I go further, let me explain my terminology. The waybill consists of the information printed on the physical card. Later, when I get into multi-destination systems, you will see that you can have multiple waybills on a single, physical card.
Figure 8 is  an example of my waybill. At the top left is the “routing code.” On the Pseudo-Soo Line this is a two-part code. The first segment indicates what yard the car must go to in order to “catch its train.” I need this yard code because I have three major yards that originate trains. If you only have one yard that does all of your classification you do not need the first segment.
The second segment indicates the train or “job” that works the receiving industry. This segment is equivalent to the tack color in the CCT system. The routing code is primarily for the yardmasters. For example, a car appears in the Weyerhauser yard, having been brought in by the Rice Lake Turn. The Yardmaster can see by the routing that is should be forwarded to Rhinelander. He would classify it for the next train to Rhinelander. Similarly, the Rhinelander Yardmaster can see that the car belongs in Rhinelander and it should be classified to the Tony Turn when he prepares that train for the road crew.
In the upper right corner is the car type. This is not necessary if you don’t care what types of cars go to what industries. Box cars were appropriate almost everywhere in the “good old days,” but I don’t want boxcars to go to the pulpwood or coal sidings at the papermill. Thus, you will probably want a way to differentiate waybills for various car types. I make this even easier by using different colors of card stock: green for boxcars, bright yellow for reefers, a dark blue for tank cars, manure yellow for stock cars, and so on.
At the center of the waybill in bold letters is the receiving industry. This is the only information the road crew needs. However, the yardmaster also uses it to block the train prior to handling it over to the road crew. This is equivalent to the industry letter code in the CCT system.
Finally, you might occasionally need some additional instructions on the waybill. In the sample provided, I attempted to add some levity because the Brewery and Coca-Cola plant were next to each other on the old Pseudo-Soo Line in Minneapolis.
My waybills are 3 inches tall by 2½ inches wide. This fits comfortably in the pocket of my card cards. Card stock is available at Target, K-Mart, Walmart, and office supply stores. If you need lots of colors, a good source is Xpedx, a printer’s supply company. They have two outlets in the St. Louis area. I have a lot of waybills, typically twelve for each industry, so I preprint the information on Avery labels. This is fast and neat. Unfortunately, there isn’t a label just the right size, so I trim a little off both ends of the 1 inch by 2-5/8 inch size (Avery 8160 for inkjets). If I had to do it again, I would increase the width of the waybill to 2¾ so the label would fit!

 The waybill is completely visible through the acetate window when it is in the pocket of the car card. It is easy to handle, easy to read, and not cluttered with extraneous information.
Most of my waybills are on single-destination cards. That is, once a car reaches its endpoint, the waybill card has to be replaced by another one. However, I also use some two-destination cards, depending on the situation and what I am trying to achieve. Figures 9a and 9b are an example, showing both sides of a two-sided card.
My loaded hoppers come from the southern Illinois coalfields, well “beyond the basement.” The PSL picks them up at its interchanges with the C&NW, Wisconsin Central, and Milwaukee Road. The cycle starts at the interchange. I remove the prior card and insert a new one. “Side 1” of that card bills the coal to an industry on the PSL, in this case the Rhinelander Papermill. During the next session, or more likely the one after that, the car will arrive at the Papermill. After that session I remove the coal load from the car and flip the waybill card over to display “Side 2.” This now bills the empty car back to one of the interchanges, not necessarily the one the car started at. This keeps things fairly random.
However, I could consider this a permanent card and just flip it from Side 2 back to Side 1 and repeat the cycle. For example, I have several brine cars that bring cucumbers from interchanges and deliver them to the Gedney pickle factory at Cameron, Wisconsin. I generally don’t replace these cards upon arrival at the interchange.
I have a fairly complicated arrangement with my milk cards on the east and west “milk” trains. There are three cars in the cycle, and each can be billed to three different endpoints, so I keep both a two-destination and a single destination card in the car pocket for each car. Early in the morning the westbound train delivered its milk car to the Lassig Dairy near Hawkins. It picks up the car left at the dairy during the prior session and takes it to Minneapolis. During the session I sneak back to the dairy and flip the waybill card. The car that just arrived is now billed back to The Soo (Sault Ste. Marie). Later the eastbound train drops its milk car and picks up the car left by the westbound.
 To keep operators on their toes, I use a number of special circumstance waybills. The most common one directs that reefers be iced at either Rhinelander or Weyerhauser. These cards are one-half the width of a regular card. They are inserted in the car card pocket in front of the regular waybill so the routing code can still be seen. An assortment of these cards are shown in figure 10.
Multiple-Destination Waybill Cards

 Four-destination waybill cards are used by many owners. These have been produced commercially by several companies. Figures 11a & 11b show the waybill card sponsored by the Operations Special Interest Group (OpSIG). These cards are about 2½ inches wide by 3¾ inches tall. Contact the OpSIG at TrainFan@aol.com for availability and cost.
You cycle through the waybills by first turning the card end-for-end, then turning it over, then end-for-end again. At the end of the cycle you can replace it or just turn in back to Waybill 1.
This form has blanks for a lot of data. At the upper left corner of Waybill 1 is a box for the car type. This is meant to be a two-digit code along the lines of the AAR code system. It is equivalent to the car type on my waybills and is for filing and making sure that you have a waybill appropriate for the car.
The “Routing” line is used in the same manner as my routing. “To” directs the car to a town or major industry; “Rcvr” provides the specific industry, siding, or “spot.” The “From” and “Shpr” lines provide similar information regarding where the car originated. Finally, “Contents” allows you to specify what the car is carrying or that it is empty. All this is typical of what a prototype waybill would contain. Some owners are very particular about this information being logical and consistent.
 However, your engineer/conductor doesn’t care where the car came from or what is in it (that’s also prototypical!). The amount of information results in a crowded, difficult to read waybill that can easily confuse an operator. Figure 12 is a suggested simplified version of the OpSIG waybill card. You can create these on your computer (I used Microsoft Publisher 97). You will need a similar “side 2” version with waybills 3 and 4 indicated. Even easier, create the basic form (with the waybill numbers) and print the routing, type, and “To” information on Avery labels. Note that I have put the waybill number at the bottom because the operator doesn’t care about it. I discuss the serial number (S/N) toward the end of this article.
Obviously, you could use these cards (OpSIG or a simplified version) as single-, two-, or three-destination cards if the particular situation makes it appropriate. If your hoppers cycled back and forth between the same industry (say, a power plant) and the coal source, two-destinations might be appropriate.
 With the OpSIG format you need a car card that hides all but the current waybill. Figure 13 shows the OpSIG car card with a waybill card in place. The waybill pocket is formed by folding the bottom of the pre-printed card upward and sealing the sides with packing tape. That hides the bottom of the waybill card so the operator only sees the current waybill. The assembled card is about 3×5 inch size.
In the “Car Type” box use the same letter codes you use on the waybills so you can match the car type with the waybill type. “Road” and “No.” are the reporting marks. “Color” is provided because in the smaller scales the reporting marks might me difficult for some operators to read. Actually, I sometimes indicate the color or some other distinguishing characteristic on my car cards so the extra information can be useful even in HO scale.
On the car card, hidden under the waybill, is a pre-printed note: “Empty Car, Return To:.” After you have cycled through the waybills, if you remove the waybill card you reveal this note. This is actually a fifth waybill. I tried this technique many years ago on the PSL but it gave problems. Typically, one-quarter or more of your cars will be “empty.” That means you need a place to receive them – large yards with dead storage tracks and/or lots of interchange tracks. If yours is a bridge line, you will jam up your staging tracks. If you have designed your layout with these considerations in mind, you should not have a problem but at least I have warned you!
Another issue is that this “fifth waybill” looks different than your regular waybills. That adds a confusion factor for the casual operator. I think making one of the positions on your regular waybill card the “empty” destination is much better. As I said earlier, anything that adds confusion should be avoided.
That takes care of the mechanics. Now we get to the really hard stuff (well, sort of).
Balancing the Railroad
To operate smoothly you need the right number of waybills for each destination. A siding with three “spots” needs thrice as many waybills as a siding with a single spot. When figuring the number of waybills required, recognize that interchanges and staging tracks are just big general-purpose industries. Every “spot” on these tracks has to have an appropriate number of waybills to keep the traffic flowing.
If you have the correct number of waybills for each spot and for each car type, your railroad will be “balanced.” That is, cars will flow smoothly without jamming a bunch of tank cars into a siding that should mostly get boxcars. That is not to say that your sidings will never be chock-a-block with cars, but over several sessions it will average out. At the end of each session some sidings/spots will be empty while others are plugged. That is the natural ebb and flow that makes it interesting.
That is, of course, if you avoid the temptation of having too many cars on the layout. Yards and sidings will be jammed if you keep adding cars. Trains will be long, meets difficult, and run-around tracks and industry sidings too short. A job that should take ten minutes will take 15 or 20. Remember that not only must the total number of cars be correct, but you must also have the right proportions based on your industry needs.
To get there, start with a spreadsheet (manual or computerized) of your industries and car types. Figure 14 is a section of my spreadsheet. This segment only covers industries at Ladysmith and I have omitted several car types for clarity.

As a reminder, you have to start with an idea of what trains are required to service your customers. The industries shown here, I decided, should all be worked by the Ladysmith Yardmaster, so this list represents the industries worked by one of my “turns.” The spreadsheet has similar lists for Rhinelander and Weyer-hauser. There are also lists of industries worked by each of several “turns” and “peddlers” (you may use different terms). Overall, I have 60 industries and team tracks that have to be accounted for.
The column labeled “Cap” indicates the capacity of the industry to load/unload cars each day. It does not indicate the number of cars that will fit on the track. Most of my customers have capacity for two cars although, as you can see, Shellbrach Junk Yard can only handle one car per day. My layout represents a fairly low-density line in northern Wisconsin in 1953, so this feels reasonable. Also, I decided I would rather have more but smaller industries in the space available. Repeating an earlier statement, my “car scale” is one HO car equals five of the real thing, so a capacity of two reflects a pretty substantial industry.
The columns labeled “Reef,” “Box,” etc. represent my car types. If you have opted to subdivide basic types into various subtypes (e.g., iced reefers vs. mechanical reefers), you need a column for each subtype.
You have to decide how many waybills you need for each “spot.” An industry with a capacity of two cars per day constitutes two spots. You could get by with just two waybills per spot, but it will severely restrict the flexibility and randomness that makes it interesting. For reasons lost in antiquity, I decided on six waybills per spot many years ago. When I moved to St. Peters in 2000, I stayed with that decision – but four or five per spot would have worked as well. I suggest that you start with four – you can always increase it later if you feel it would be useful.
Having settled on six per spot (as shown in the spreadsheet), you see that I need 12 waybills for most industries. The column on the far right, “Tot,” reflects that requirement. This is actually a sum of the car-type columns to show that I have generated enough waybills. At issue then is how to distribute the waybills between different car types. At Attabury Furniture, I decided that 9 out of 12 waybills should be for boxcars. The other three waybills are for a coal hopper, a general service gondola, and a flat car. This seems to be a fairly reasonable distribution for a furniture manufacturer in the mid-1950s. McDonald’s Lumber gets the same distribution, while Frazier’s Plumbing and the team track only receive boxcars. Flatley Oil gets only tank cars, although it would be perfectly reasonable to have two or three boxcar waybills in the distribution. Fredericks Foundry is a new industry, and for some reason I did not make as many waybills as I should have. As a result, the foundry will receive a few less cars than its “fair share.”
Again, the purpose of all of this is to balance the railroad. If you had 10 waybills per spot for the team track vs. six for all other spots at Ladysmith, on average you would pull 67% more waybills for the team track than for the other industries. This system would diligently route an excessive number of cars to the team track. No fun for you or your operators!
The capacity of the industry also affects the way I reset after an operating session. As mentioned when I discussed the color-coded tack method, if there are more cars at the industry than its daily load/unload capacity, those excess cars should stay at the industry. Thus, if the capacity is two, two of the cars would get new waybills while any others would remain billed to the industry. The operator will see when he works the industry that two cars should come our and the rest remain. If you have balanced your supply of waybills and don’t have too many cars on the layout, over the next one or two sessions those extra cars will have “served their time” and the industry will no longer be overloaded.
It is also possible when you randomly pick a waybill while resetting the layout that it will be for the same industry. No problem. Just pull the old waybill card and insert the new one in the car card pocket. This tells the operator that the car should remain in place for another day. This applies even if the industry is at or below capacity. This doesn’t happen often with my 60 industries, but will be more common if your have fewer customers. The idea is to have fun while providing some challenge to your operators, so don’t worry about re-billing a car to an industry.
Figure 15 is the segment of my spreadsheet listing the interchange tracks. In this case, the “Cap” column indications the “ideal” number of cars delivered to the interchange each session, rather than the fixed capacity of industries. The difference is that when I reset the interchanges, all cars get new waybills, even if there are more than the ideal number at the interchange. This is obviously what would happen in real life – the receiving railroad would take all cars you delivered and they would have given you everything they had.

The matrix shows that there are still six waybills per “spot,” requiring a lot of waybills for the larger interchanges. You can also see the large number of coal hoppers going to the interchanges. Beyond that, it shows the mish-mash of car types that you would expect to see at a general-purpose interchange.
Finally, Figure 16 shows the portion of the spreadsheet devoted to my staging tracks. I actually have eight staging tracks, but only three are for freights.

Staging track capacity and resetting are handled the same way interchanges are. You can see by this matrix that I consider a lot of my reefers to be in bridge traffic – moving from the west coast eastward across the northern tier to New York and Boston markets. Conversely, the paucity of gons, stock cars, etc. indicates that most of that traffic is within the PSL or with its interchange railroads. There are no waybills for coal hoppers or pulpwood gons because that traffic is exclusively between the PSL and the interchanges.
So far my discussion of the mathematics of waybills has been on the basis that you opt primarily for single-destination waybill cards. After every session, you replace all cards for cars that have reached endpoints – industry, interchange, or staging – with the exceptions noted. But how will balance be achieved if you opt for an OpSIG type card with up to four destinations per card?
First, if all of your waybill cards utilize all four destinations, it means that you have four waybills per car rather than four per spot. You will probably have more cars on the layout than spots. Recently I counted 195 cars (not counting unit trains, such as my ore train and passenger trains) on my layout, compared to about 160 car spots, a ratio of 1.22 cars per spot. Using 4-destination cards leads to a waybill-to-spot ratio of almost 5 – more than adequate for car distribution flexibility and randomness.
So it is reasonable to have one waybill per car and never have to exchange the card. This is neat because it is much easier to turn cards that to replace them. However, with multiple waybills per card, it becomes much more difficult to keep track of what you have done. I came up with the following spreadsheet format (figure 17) for Noel Baker when he started writing his waybills.

In this matrix I have put the industries and capacities across the top and the car types in the left column. I have given each card a serial number (S/N) for tracking purposes (remember this on my simplified version of the OpSIG card on page 13?). You will have as many waybill cards as you have cars on the layout. Note that each card has a maximum of four destinations indicated. If a car goes back and forth between a coal mine and power plant, then just repeat the sequence twice on one card. Count it twice on the spreadsheet. Note that if this hopper is assigned to a unit train from mine to power plant and back, you don’t need waybills (the train order suffices) unless the cars are to be spotted at different tipples at the mine. Only if you have some sort of three-step sequence, similar to my milk car situation, would you not use all four positions. When you are done, the grand total for each industry should add up to something near your expected ratio of waybills-to-spots. If you add more cars, your waybill-to-spots ratio will increase, but that is not a bad thing. If the railroad starts bogging down because you have too many cars, you remove some of them along with their car cards and waybills.
If I started over, I would probably use a simplified form of the OpSIG waybill card. With a computer, it is much easier to create the cards and keep track of waybill counts than when I started. As I said before, flipping cards between sessions is much easier than exchanging them. I would still use colored card stock to make the cards, but that is a minor consideration. Of course, my car cards with their transparent pockets would not work. I would certainly use something like the OpSIG car card. That would be another real advantage because my car cards are very time consuming to make. The OpSIG form is much easier.
If you are interested in operations you should visit a couple of operating layouts and see how it is done. You should also join the NMRA Operations Special Interest Group. They have an excellent quarterly journal; the dues are $15 per year.
Operations SIG Box 872 Arlington Heights, IL 60006-0872
The Pseudo-Soo Line welcomes visitors to its monthly operating sessions. I will put you to work and you can help us achieve our goal of unparalleled service. Remember our motto: “We give prompt service no matter how long it takes.”


I greatly appreciate you taking the time to document how you constructed your operations. I learned from you and designed my operating system around yours. Thanks!