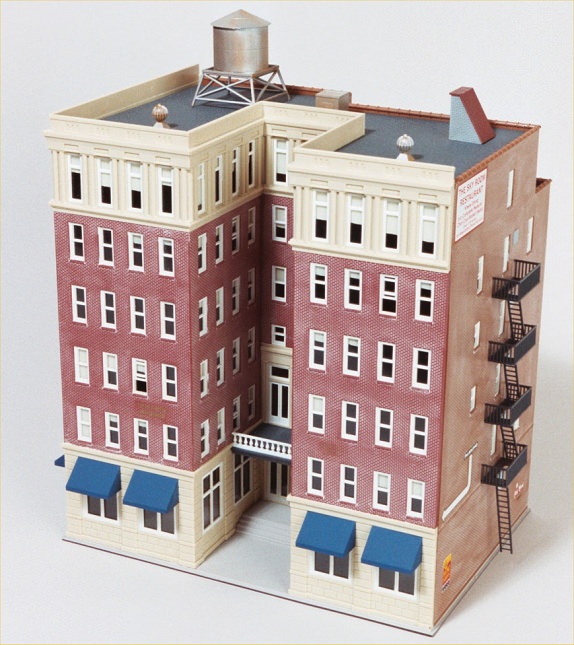
Bachmann Spectrum “Ambassador Hotel” 160-88002
photos by Richard Schumacher
The first thing you should do when building any kit is to browse through the instructions and look through all of the parts, in order to get a feel for what kind of project it will turn out to be. You will be able to see if there are any tools or paint colors you have to go out and purchase if you do not have what is required on hand. You can also get a feel for how you might modify the building. In this case, although the kit came with the parts molded in realistic colors, I decided to paint all the window frames white, instead of the sand color of all the parts on their sprues. The top and bottom floors of the building are large blocks and columns in sand color, so going with white windows would be a nice contrast. The awnings will be painted blue. The rooftop details, including vents and a water tower, were painted silver, and then weathered a rust color with chalk powder.
When painting, the best finish is achieved with an airbrush. Pick out all of the parts that will be the same color, and leave them on their sprues if possible. Small detached parts will blow across your table from the force of the spray from the airbrush. With this model, some of the window frames were incorporated in pieces for the building sides, while some were separate parts. That meant that they had to be masked off. If you do any airbrushing on a regular basis, it is very handy to have specialized masking tape, in widths of 1/16, 1/8, and 1/4 inches. Applying all the little strips of tape around window frames is tedious, but the end results are worth all the effort. There were still some windows that could not be masked off because there were round columns on either side of them, so they had to be painted by hand. No matter how careful you are, you will paint outside of the lines, so to speak. A single edged razor blade or hobby knife will allow you to scrape off your errant brush strokes.
Before anything is assembled, and after you have applied all your color changes, you have to spray Dull Cote over all the parts in order to kill the telltale plastic sheen. This is a very simple thing to do, but is something that many modelers ignore, and their finished plastic buildings look just like plastic.
One other recommended step is to apply a commercial mortar mix on the brick walls. Just brush it on, wait for it to dry, then wipe it off. The product is forgiving, and you can get back to it the next day if you have to before it dries too hard to effectively remove. This fills in the mortar joints with a white color between the bricks on the walls, and is a very realistic effect. Again, this is another way to get rid of that plastic sheen.
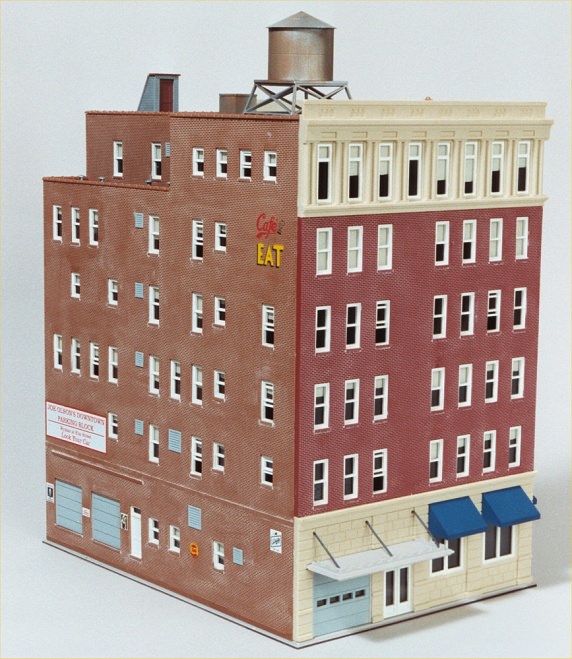
Rear View of Bachmann Spectrum “Ambassador Hotel” 160-88002
This building kit was engineered so that you do not have to glue in the window frames and glass. There are pegs molded on the back of all the walls, and the window glass has matching holes. Put the window frame in its opening, then push the glass down so the pegs go through the holes and lock in place. The glass holds the window frame and itself by the friction fit of the pegs through the holes. This is a real savings of time and effort. Since this kit represents an older building, take the time to apply partially drawn window shades. We want to simulate the pull-down and roll-up kind of shade. There are three ways to do this. Sometimes the manufacturer will supply a sheet of paper with curtains drawn on it in the shape of the window openings. You just cut them out and glue them over the back of the glass. Lacking that, you can use colored paper or a manila folder and cut pieces out that are larger than the window opening so you have an area to apply glue. Do not use masking tape. Although it is the right color and is very easy to use, it will dry up over time and fall off inside the building. I chose a third method, antique white acrylic paint from a craft store. Use a wide brush and apply it thickly, right on the back of the window glass. You have to be careful to make the lower edge of your paint stroke a straight level line, or else you will have crooked window shades. Look at the front of the wall at each window to see if you have to make any adjustments. Don’t be afraid to put more paint on. Make the shades drawn to varying lengths. Leave some windows blank. The more windows you do like this, the nicer the effect will be.
The instruction booklet takes you through assembly in sequence, which allows faster assembly and less time agonizing with how to put the kit together. I like to use PBL nippers to remove parts from their sprues. A flexible sanding stick comes in handy to remove any remaining nubbins. Walls are put together as subassemblies, then erected floor by floor, around the building. One of my favorite products is Faller Plastic Cement. It has a long thin built-in metal applicator, and sets up quickly. You do not have to hold the pieces together very long, and they do not pop apart afterwards. If you work patiently and carefully, you can make almost invisible seams with no sloppy glue marks.
After the walls are finished but before the roof is applied, it is a nice touch to install a view block. As it is, if you look at the building, you can see all the way through it to the other side, because there are no interior walls. I like to use a small piece of black foam core board, cut to fit on a diagonal slid down between opposite corners of the interior walls. Using this diagonal trick allows one piece of view block material to take care of all four walls.
I chose to delay applying exterior details such as awnings and fire escapes until the building was assembled. These parts protrude from the flat wall surfaces, and you want to be able to lay the building on its side from time to time during the assembly process. This way, it will lay flat and you won’t break anything off. When it came time to put these on, several very small holes had to be drilled. A drill bit set with numbers ranging from 31 to 80 is a nice thing to have on your workbench. The supports for the loading dock awning would not fit in their holes, and it took several successive drilling operations with larger bits to make these pieces fit. With these tiny drill bits, you have to use a pin vise or other such hand-held tool, and use finger power to drill holes. It is easy to snap the smaller drill bits off.
When assembling pieces that you have painted, you want to scrape the paint off the edges that will be glued. You want the glue to stick to the plastic, not to the paint.
I chose to leave the roof pieces loose at this time. Since it fit snugly, it will not fall out on its own, and provides access to the inside of the building for fixing something, or installing lighting.
The last step is applying decal signs on the walls. Nothing brings a building to life more than signs (and people, of course!). Bachmann included two decal sheets of signs, and I chose subjects that would be pertinent to the hotel. Signs for parking, the top floor restaurant, and the coffee shop. After they dry, an overspray of Dull Cote will tone down the shiny surface of the decals.


Pingback: Buildings on the Avenue: Bachmann City Scenes Hotel II | Modelling the Beautiful American City