photos by Richard Schumacher
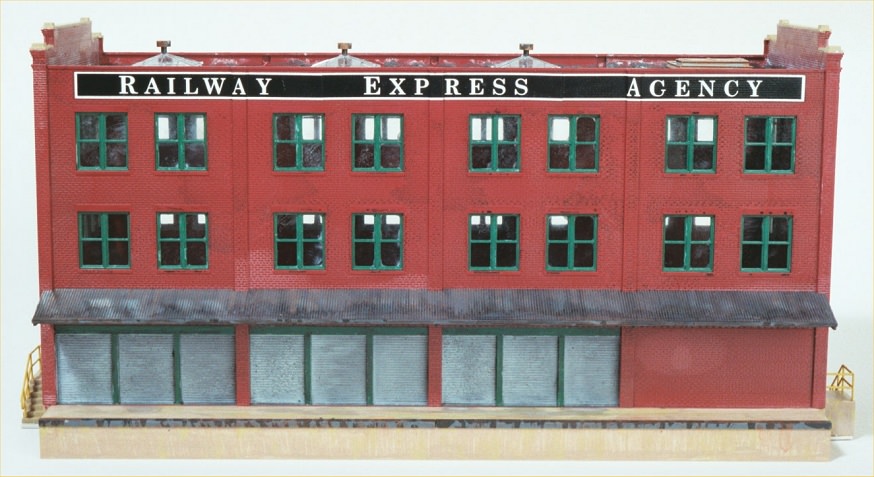
Walthers Cornerstone “REA Freight House” 933-3095.
The instruction sheet for Walthers’ Railway Express Agency freight house has a page of fine type giving a detailed description of how the prototype buildings functioned and how the model might best be integrated into your layout, but barely two dozen sentences on how actually to assemble the model. These instructions consist mostly of explaining the proper sequence of assembly which they do quite well without saying a word about painting (much less weathering), or tools, or techniques. I usually spend more time in the armchair than at the workbench, so I had to re-learn a lot about assembling a plastic kit.
Before building a kit I always take all the parts out of the box, look at them, look at the instructions, then put everything back in the box, close it again, and go away. I then repeat this as necessary until I’ve got up the nerve to start work. When I finally decided the time had come to get going on this kit, my first step was to paint and weather the parts while they were still on the sprues.
The kit is cast in four colors of plastic in addition to clear plastic window and skylight glazing, so it would be a nice enough model even if you didn’t paint it at all. The dark brownish-red of the brick walls is an especially good representation of real brick; brick comes in a wide variety of colors, but most tend more toward brown, not red. The very dark gray used for the corrugated iron canopy over the docks is equally believable. The warm grey color used to represent the concrete loading docks and stairs is close, but much too smooth and uniform. The light gray plastic used for the window frames, dock doors, man doors, canopy brackets, and handrails makes them all look like plastic instead of wood and steel.
My paint box contains a variety of paints, both water- and solvent-based, and for this kit I used what I had on hand, applying all of it by brush. One ought to use water-based paints on unprimed plastic, and mostly I did. The exception was on the window frames; for these I used Floquil Weyerhauser Green, because it was the only paint I had that was a good match for that dark green that was so widely used for exterior trim and woodwork up through the 1950’s or so. I suppose there was some particular pigment that was both more durable and less expensive than the alternatives; at any rate, it looks to me like just the right color for window sash. I decided to leave the dock doors grey but painted the frames green. The brackets that support the canopies over the loading docks got a coat of Poly Scale Engine Black. The handrails that go on the steps I painted a bright safety yellow. I gave the man doors (as opposed to the coiling dock doors) a solid coat (not just weathering) of Poly Scale Earth, which has a sort of generic industrial beige look. These door castings have a very fine raised border to represent the door frame, and after the base coat dried I used a very fine brush to outline the frames in Weyerhauser Green; the door knob got a tiny dab of black.
The skylights are each a single pyramidal casting of clear plastic. The mullions between panes of glass are cast into skylight; I used a permanent laundry marker to “paint” these black. It doesn’t take too much skill, just some care, to run the edge of the felt tip along the raised mullions, and it increases the realism of the skylights enormously.
The wall castings don’t have brick lines below the level of the first floor door thresholds. This part of the wall is mostly hidden by the loading docks and steps, but those parts that are not hidden are clearly intended to represent a concrete foundation. Unfortunately, the whole wall has to be cast in the same brick colored plastic, so I painted this lower foundation part of the wall with Poly Scale Mud as a base color, and then set about using weathering to blend the appearance of this concrete foundation with the concrete loading docks and steps. I started by liberally dry- brushing the docks and steps with Mud to bring them more into line with the color of the wall foundations. When the forms are first stripped from real concrete, what you see is almost entirely the cement paste, which is a cool grey color, but it doesn’t take long for the weather to wear away at the cement and expose the sand and gravel aggregate. Around St. Louis, that aggregate, especially the sand, is usually a warm brown or tan color, so I worked at giving my model concrete a warmer look by dry brushing with Earth. Since I was trying to simulate flecks of color HO scale grains of sand I was careful to use a very dry brush, but made sure I got a bit of paint on every part of the concrete. I then dry brushed Grimy Black in a few spots on the vertical face of the loading dock, using vertical brush strokes and applying it mostly near the top to give the appearance of grease or oil which had run down from the dock. I also added similar grease marks to the separate casting that represents a steel angle guard cast into the lip of the dock.
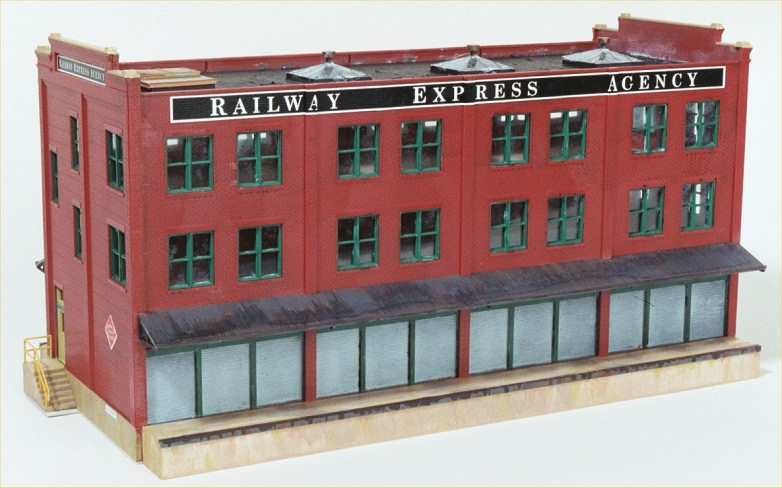
Walthers Cornerstone “REA Freight House” 933-3095.
My basic weathering medium is ink. I fill a film canister about half full of rubbing alcohol and then add a dozen or so drops of black ink. I usually use india (drawing) ink, but when I sat down to this kit I discovered I had none, and so substituted stamp pad ink.
I laid out all the kit parts except the roof and the clear plastic glazing material on a large sheet of corrugated cardboard and began washing them with my ink and alcohol, applied with a large (3/8″) brush. As the alcohol evaporates the ink would like to bead up on the plastic, so it tends to stay mixed with the diminishing quantity of alcohol. Since the alcohol evaporates last from crevices, such as the brick lines cast into the walls, that’s where most of the ink is left when the last of the alcohol goes. Prototype dirt and soot is similarly attracted to prototype crevices, so the model takes on a very realistic pattern of grime. The ink also settled well into the corrugations of the coiling dock doors, giving them some depth and shadow, and into the corrugations of the iron dock canopy, which is already dark grey but benefits from the mottling and variation in grey that the ink gives it.
Even after it has been left overnight to dry, the ink wash has the disadvantage of staying slightly tacky that is, it will smudge off on your fingers if you handle the pieces too much. An overspray of Dullcote will take care of that.
The last step in weathering the pieces before assembling them is to add some rust. I have some Weather-It brand liquid rust, which goes on very thin, looks at first like I’ve used way too much, and then as the vehicle evaporates it actually leaves a very modest coat of rust behind. I used this on the dock canopies and canopy brackets, on the dock itself in streaks, and on the turbine ventilators that go on top of each skylight.
I followed the kit’s order of assembly instructions step by step, with one exception. Instead of assembling all four walls onto the base and then trying to drop the roof into place between the parapets, I left one end wall off and slid the roof piece into place from the end. I also cut and installed a piece of stiff cardboard (from a legal pad) at the third floor level, so that when a viewer looks in the windows on one side of the building, they can see only the row of windows for that floor on the other side. The tops of the second floor window sash castings make a perfect ledge on which to rest this cardboard floor; I notched around the stair landing window that falls between the second and third floors. I didn’t need to install a cardboard second floor, because this kit has almost no glazing on the first floor level, so there’s no see-through problem to solve.
I used Testor’s Plastic Cement for almost all joints between opaque plastic parts, dry fitting the parts and running a very small paintbrush of cement along the blind side of the joint and letting capillary action draw the cement into the hairline between pieces. For attaching the clear glazing I used a generic gap-filling cyanoacrylate; I probably didn’t need the gap-filling quality but it was the only super-glue in my box. I used this same cyanoacrylate to attach the handrails to the stairs and the dock canopy to the brick wall, since there are joints with very little contact area between the parts.
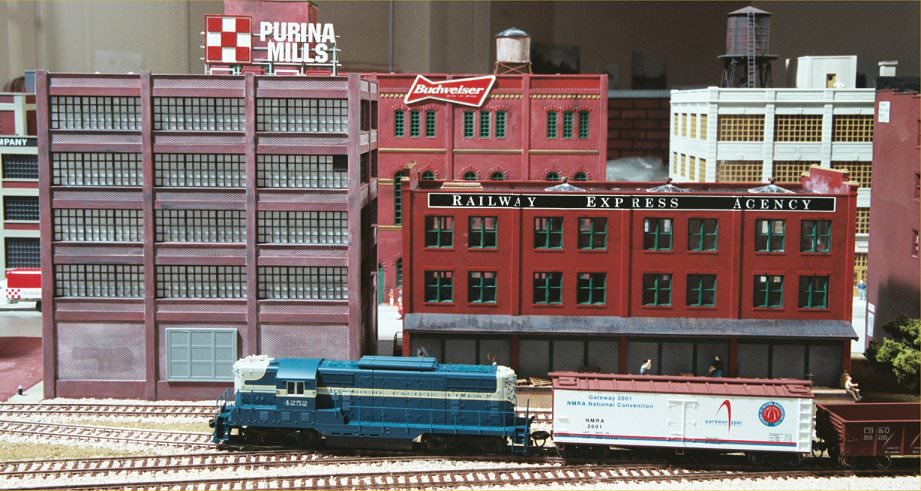
REA Freight House on the Missouri History Museum Model Railroad Layout.
Since the most visible part of a building on most layouts is the roof, I added a little extra detail to it. The kit has four equally spaced skylights, but no roof hatch or access ladder to the roof. Flat roofs are high-maintenance, and skylights are worse, so this building ought to have some convenient way for the maintenance man to get up there and patch leaks. I put the skylight at the stairway end of the building back in my parts box and cobbled together a roof hatch to take its place. First I cemented a square of scribed styrene to form a platform blanking out the entire skylight curb, which is about eight scale feet square. Roof hatches come in various sizes, but three foot square or thereabouts is the most common; since I had to justify taking out a much larger skylight than that, I made mine a double-wide, with a pair of hatches that meet in the middle just like a pair of doors. I cut a rectangle of flat styrene three feet by six feet, framed it in styrene H channel, and cemented it over one half of the scribed platform. A strip of styrene 1×2 represents an astragal dividing the rectangle into a pair of three foot by three foot doors. Tiny snippets of 1×2 represent strap hinges on each leaf ; I hold these in place with the point of a scriber while I dab cement on, and don’t move the scriber until the cement has completely evaporated. The entire hatch assembly was painted a non-descript maintenance department shade of grey, then got a wash of ink followed by a wash of rust.
The roof itself was the final part of the project. Up until thirty years or so ago, most prototype flat roofs were built up from multiple layers of roofing felt each embedded in a coat of hot asphalt or coal tar. The final coat of asphalt was often, but not always, topped with pea gravel; on this model I went with just the felt and asphalt. I used thin, cheap, yellow tracing paper cut into 3/8″ strips to represent the three foot wide courses of roofing felt. I slopped down a thick stripe of Engine Black down the center of the roof deck (working around the skylights), laid a strip of paper in it, and then coated the top of the paper with the same Engine Black. I then worked from this center strip toward the outside long walls in both directions, overlapping the strips slightly each time. The paper swells as it absorbs the paint, creating unrealistically large wrinkles and puckers, but as it dries it shrinks again. There are numerous wrinkles left in the tracing paper roofing felt, but they wind up being much smaller and more realistic.


Hi Mike,
Is the reverse side of this model identical to what can be seen in your photos ? I am considering purchasing this kit if it can be doubled in length.
Cheers,
Gary.
Yes it is. You can change the number of dock doors as well. We have an example where two of the kits were used to make a double-long version at https://www.gatewaynmra.org/2003/gateway-central-4×6-foot-small-ho-scale-model-railroad-layout/ (scroll down to the bottom). You could also use one kit to make a double-long background building (where you don’t see the back side). That would require special consideration for the roof.