photos by Richard Schumacher
This kit includes the crane, wood platform and ramp, concrete ramp, office, conveyor and unloader, utility pole, and wood fence sections.
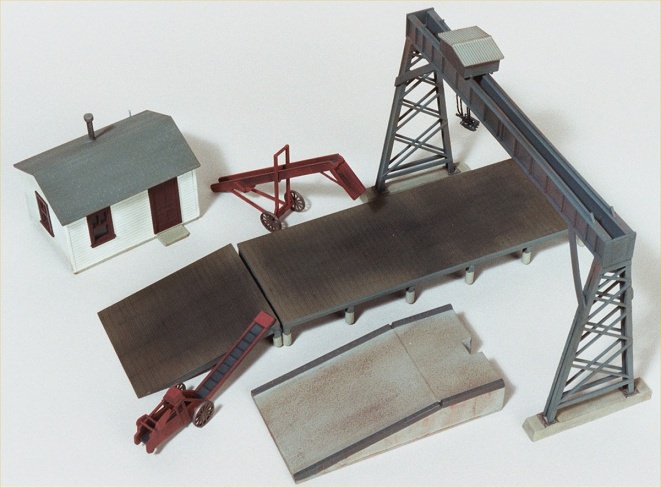
Walthers Cornerstone “Team Track” 933-3166
Testor’s Micro Shear Sprue Cutter was used for removing larger parts from the plastic sprue trees. Micromark’s Despruing Tweezers was used for small parts.
All parts are sanded with sanding sticks and/or needle files to remove burrs remaining after removal from the sprue and to remove ejection pin marks.
Gluing
Testor’s Cement for Plastic Models (the thick type) was used by placing a blob on a piece of cardboard (old business cards work well for this) and applied to the model with a toothpick.
Some parts were attached with CA adhesive – also applied with a toothpick.
Ambroid Pro-Weld was used to assemble the walls of the small building and the walls of the hoist house.
Paint
I used an Aztek double action internal mix airbrush for this job.
I used primarily ModelFlex paints when airbrushing. They are pre-thinned for airbrush use, and the bottles screw directly onto my airbrush siphon feeds. 30 to 35 psi works well for this paint.
For some airbrushing Floquil was used because I didn’t have any ModelFlex in the correct colors. A 75% paint 25% disol mixture was used to airbrush with the Floquil.
Testor’s Dullcote was used as a sealer for weathering. The airbrush type was used (not the aerosol can type) thinned with a 50% mixture of lacquer thinner. 15 to 20 psi works well for this mixture.
Floquil was used for brush painting. I find that this type works much better than acrylic paints (such as ModelFlex) for brushing.
Everything was painted with a coat of ModelFlex Grimy Black as a primer with the exception of the fences which I painted ModelFlex Primer Gray (to get a lighter topcoat).
Decals
Microset and Microsol are my favorite decal applying solutions. I use a small scissor for decal cutting, a cross-locking tweezers to hold decals and a small brush for Microset/Microsol application and for decal positioning. I use room temperature water in a kidney bowl (acquired from a hospital visit) to soak the decal. I usually submerse the decal in water (holding it with the tweezers) for 20 seconds.
The decal was then placed on a paper towel.
Apply Microset to the model where the decal will go. I pick up the decal with the tweezers and position it.
Weathering
An earth tone set of colored chalks was used for weathering. The chalk was applied by sanding some of the chalk off directly onto the model. An inexpensive brush is used to blend in the colors. Blacks and browns are used to simulate dirt, oranges and reds for rust, and light yellows for dust.
A colored pencil set was used to simulate drips (rust and liquid residue) by drawing lines directly on the model and rubbing with a finger to achieve the desired result.
After weathering, the chalk was sealed with an application of Testor’s Dullcote.
Assembly
Virtually everything was assembled before painting. The exceptions were: the hoist house (which sits on top of the crane), the hoist house’s roof, the roof of the small building and the windows of the small building.
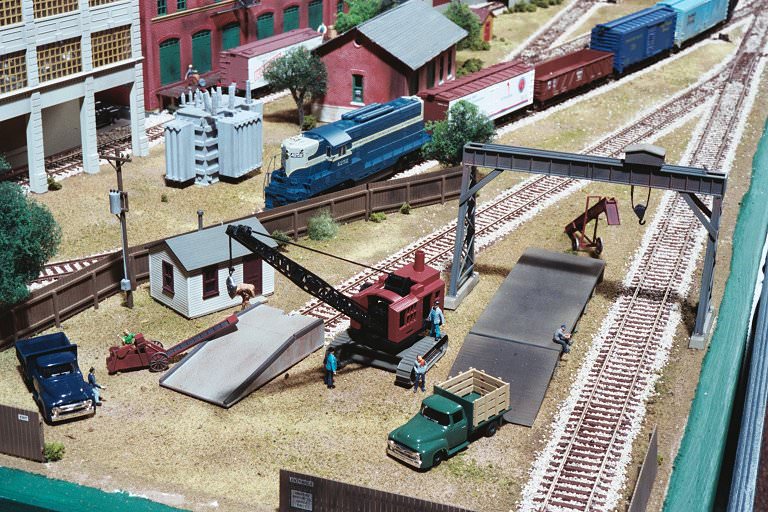
Walthers Cornerstone “Team Track” in place on the Missouri History Museum model railroad layout.
Crane
Crane assembly required quite a bit of sanding to make parts fit properly. Even after sanding, some seams still needed Squadron Green plastic putty.
I assembled the hoist house without its roof and didn’t attach it to the main model. There were several reasons for this.
First the house needed to be strung with thread which is used to simulate the cabling for the hook–I didn’t want the thread airbrushed with paint! So waiting to attach the roof later would allow the hoist house to be painted before the thread was strung. It also let me paint the roof separately without masking.
I didn’t attach the house (sans roof) to the crane because I was unsure where the crane’s hook should be placed on the actual layout.
I hand painted the concrete footings with Floquil Concrete and the metal attachment plates with Testor’s Steel.
Loaders
The loaders assembled easily. The only difficult part being to use a pin vise to enlarge the holes for the wheels so that they could be glued on. After priming with grimy black paint. I masked the area where the conveyers are with regular masking tape.
I cut narrow strips with a small scissors and applied. I used two strips for each conveyor so that the “true” side (the side not cut with the scissor was towards the outside of the conveyor. I burnished the edges with a small screwdriver and trimmed any excess with a new #11 X-acto blade.
I repainted the entire assembly a maroon red, waited for it to dry and removed the masking.
I hand painted the wheels Floquil Roof Brown, and the wheel rims Testor’s Steel.
Fences
The fences required a considerable amount of sanding. The vertical posts had a lot of ejection pin marks. After sanding, I used a HO scale ruler to determine where to place the vertical posts since there were no location marks. I spaced them evenly making a mark with a 0.5mm mechanical pencil at the locations where I wanted the posts, then glued them in place.
I primed these parts with a ModelFlex light gray color (to make the top coat lighter). I painted these with a light coat of Floquil Roof Brown (since I was out of ModelFlex).
I applied decals to the fences by first dipping the decals in cool water for 20 seconds holding the decal with a cross sprung tweezers, placing them on a paper towel and then applying a coat of Microset to the model where I wanted them to go. I picked up the decal with the tweezers and used a brush dipped in Microset to slide the decal onto the model. I aligned by using the brush. After the decal was where I wanted it, I used Microsol to set the decal in place.
This worked well for everything except the graffiti decals. In retrospect I should have painted the entire fence with a gloss coat then, applied the decals, then Dullcote. The graffiti doesn’t look natural. It looks like a decal, mainly because it didn’t adhere well to the dull finish.
I applied weathering (with chalks) and then tried creating a little of my own graffiti with a white pencil. This actually looks the best to me! It is what I will be doing in the future to simulate graffiti.
I then sealed everything with Dullcote.
Concrete Ramp
I assembled the ramp walls with Ambroid Pro-Weld and the bottom with Testor’s Plastic Cement. I filled gaps with Squadron Green Putty. After priming, I painted the entire ramp ModelFlex Concrete. After this dried I masked off the ramp and side walls with masking tape, leaving the ramp side rails exposed. I repainted these ModelFlex Grimy black.
I weathered the center sections of the ramp a brown color (chalk) and the sides a rust color. More sealing with Dullcote.
Wood Ramp and Dock
I assembled the ramp and dock to the support piers without using the bases for these. I thought that the appearance on the layout would be enhanced without the bases. I did use the base to ensure that the piers where aligned (without gluing to it) until the glue was dry.
After priming I airbrushed the top of the ramp and dock Floquil Roof Brown without masking. Any overspray would appear as dirt on the piers after weathering.
I used black chalk rubbed with a finger in the center of the ramp and dock to make it appear well used. I also applied a little yellow for “dustiness”.
After sealing with Dullcote, I decided that the concrete footings should be, well, concrete color! So I hand painted these with Floquil Concrete.
Telephone Pole
I assembled all the telephone pole parts before painting. In retrospect I should have waited before attaching the conduit from the electrical transformer to the electrical box mounted on the pole. It made painting afterwards difficult. I drilled a small hole in the bottom of the transformer with a pin vise to make gluing it in place easier.
After priming, I painted the telephone pole assembly Floquil Roof Brown.
I hand painted many details on the pole. I used Testor’s gloss green for the glass insulators, Floquil Primer Gray for the electrical transformer, conduit and electrical box. Floquil Engine Black for the transformer insulators and Floquil Rust for the bolts.
I weathered with black chalks and sealed with Dullcote.
Building
I assembled the walls and the base of the building with Ambroid Pro-Weld. I left off the windows, roof, tank, vent stack and power meter.
I primed the building wall/base assembly and the roof. I then painted the building ModelFlex Reefer White.
The base of the building was hand painted Floquil Concrete. I hand painted the vent stack Testor’s Steel, the power meter Floquil Primer Gray, and the Tank Floquil Engine Black with Floquil Roof Brown legs.
I painted the windows and door while still on the sprue. I used ModelFlex paint–a Dark Maroon color. I carefully removed these from the sprue and scraped paint off two (non-visible) sides for attachment to the building. I glued these in place with Testor’s Plastic Cement. I glued the window “glass” in place with Testor’s Clear Parts Cement. I used the smallest amount of glue possible for this (a micro drop in each corner of the window).
Then the roof was glued in place.
One decal was added to the building. The electric power meter and the tank were attached to the building back – I attached these with a small drop of CA adhesive.
I then weathered the building with black and brown chalks and the roof with a light yellow chalk.
The building was then sealed with Dullcote.


